Getting Started in TensorBoard
The What-If Tool can be found inside of TensorBoard, which is the visualization front-end that comes with each TensorFlow installation. The dropdown menu in the top-right of TensorBoard contains an option to navigate to the embedded instance of the What-If Tool.
To use the What-If Tool inside of TensorBoard, you need to serve your model through TensorFlow Serving’s prediction service API, in which models accept TensorFlow Example protocol buffers as input data points, or you can provide your own custom python function for generating model predictions. See TensorFlow Serving documentation for more details. The dataset to use in the tool must be stored as a TFRecord file on disk, in a location accessible to the running TensorBoard instance. The file to load must either be under the log directory provided to TensorBoard on startup, through the logdir=PATH flag, or you can add another path that the tool can load files from through use of the -whatif-data-dir=PATH flag. Not all models meet these criteria, and for those models, the What-If Tool can still be used in notebook mode, outside of TensorBoard.
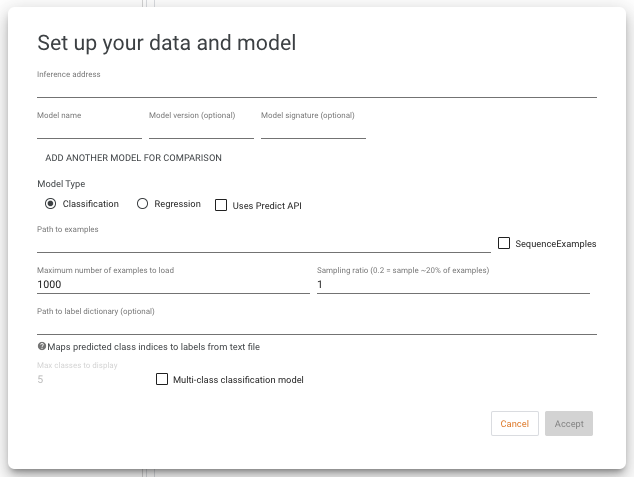
When opening the What-If Tool in TensorBoard, you will encounter a setup dialog which allows you to point the tool to your model(s) to analyze and the dataset for the analysis, among other options.
Model Configuration
The inference address must be set to the address where TensorFlow Serving is hosting the model, in the format <host>:<port>. The model name must be set to the model name provided to TensorFlow Serving. You can optionally specify the model version and signature if you need to query an older version of a model, or you need to query the non-default signature of the model. If using a custom prediction function instead of TensorFlow Serving, you still need to
provide an inference address and model name, which will be provided to your custom function, although your function can ignored them if not necessary.
Use the radio buttons to indicate if the model is classification or regression. For multi-class classification, also check the “multi-class” option, and optionally provide a maximum number of highest-scoring classes to display for each data point (in the case of models with a large number of possible classes).
If the served model uses the TensorFlow Serving Predict API (as opposed to the standard Classify or Regression APIs, then check the “uses Predict API” checkbox and provide the names of the input and output tensors that the What-If Tool should use for sending data points to the model, and for parsing model results from the output of the model.
For using the tool to compare two models, click the “add another model for comparison” button and fill out the model information for the second model in the same manner.
For classification models, by default the classes are displayed as “class 0”, “class 1”, and so on. You can optionally give string labels to each class by providing a label dictionary file, to provide a better experience to users trying to understand the model’s outputs. This dictionary file is just a text file that has a string on each line, and has a line for every class that the model can return. If you provide the path to this file in the appropriate input field on the setup dialog, the tool will display those user-friendly class names throughout, as opposed to the class indices.
Custom Prediction Functions
Instead of using a model through TensorFlow Serving, you can provide your own python function for the What-If Tool to use for making predictions. To do so, launch TensorBoard and use the --whatif-use-unsafe-custom-prediction [file path] runtime argument to provide a path to the file containing your prediction
function. The file must contain a function with this name and signature: def custom_predict_fn(examples, serving_bundle):. The function takes in a list of
examples to predict, along with the serving_bundle object which contains setup information from the tool, such as the inference address, model name, and model type provided during tool setup. The function should return a list of model outputs, one per each example provided. For regression models, the list item should be a single number. For classification models, the list item should be a list of numbers, one per each possible class.
Additionally, with custom prediction functions, the model can return more than just prediction scores. If you have a way to calculate feature attribution scores for each prediction (such as through SHAP or Integrated Gradients), those can be returned as well. To do this, instead of returning a list of scores from the custom prediction function, the function should return a dictionary, where the predictions list is stored under the key predictions, and the attributions are stored under the key attributions. The attributions should also be a list with one entry per datapoint. Each entry should be a dictionary with the keys being the names of the input features to the model (matching the features in the input data), and the values being the attribution scores for those features for the specific datapoint. For single-valued features (where each feature contains a single value as a number or string), the attribution should be a single number for that feature. For multi-valent features, such as can be specified in a tf.Example feature value list, the attribution for that feature should be a list with an attribution score for each feature value in the input datapoint (example notebook).
Lastly, custom prediction functions can return arbitrary prediction-time information for each datapoint. This can be useful in the case that you can calculate an additional metric per-datapoint at prediction time and wish to display it in the What-If Tool. One example of this could be a score calculated for each datapoint at prediction time for how similar each datapoint is to some anchor datapoint or concept, according to the internals of the model (see the TCAV paper for one example of such a metric). To do so, have the custom prediction function return a dictionary, where the predictions list is stored under the key predictions. Any other metric can be included by adding an additional key (this key will be used to display the metric) to the dictionary, and having its value be a list with one entry for each datapoint provided to the custom prediction function. The list entry should be a single number or string for display in the tool. Any returned metrics will be listed in the datapoint viewer in the Datapoint Editor workspace, and also usable for creating charts in the datapoints visualization, and for slicing datapoints in the Performance workspace.
If the data points in the dataset contain a feature named “predictions”, the numbers in this feature will be interpreted by the tool as the results of a regression model. If they contain a feature named “predictions__probabilities”, the list of numbers in this feature will be interpreted as the results of a classification model, with the first entry being the score for class 0, the second entry being the score for class 1, and so on.
If there are any features with the prefix “attributions__”, the numbers in those features will be interpreted as attribution scores for each corresponding input feature and will be used for the feature attribution-based capabilities of the What-If Tool. An example would be a feature named “attributions__age” containing attribution values for the input feature “age”.
Dataset Configuration
In the “path to examples” input box, provide the path to the TFRecord file from which to load the dataset. If the file contains SequenceExample protocol buffers, as opposed to standard Example protocol buffers, then check the “SequenceExamples” checkbox.
You can specify a maximum number of data points to load from the file, which defaults to 1000. The tool loads the data starting from the beginning of the file until it reaches the end, or the maximum number of examples specified. If you wish to use sampling to not just grab the data points of the front of the file, you can set the sampling ratio to a number above 0 and below 1. This number represents the chance that a given data point will be loaded and sent to the tool. So, with maximum examples set to 1000 and a sampling ratio of 0.2, the tool will start at the beginning of the file and for each data point it encounters, it will load that data point with a likelihood of 20% (and it will skip that data point with a likelihood of 80%). It will continue in this manner until 1000 data points are loaded, or the end of the file is reached.


